Calibration Know-How
What's Calibration?
During the calibration in measurement technology calibrators detect and document reliably and reproducibly how large the deviation of a measurement device to a normal is. Measuring control, calibration and traceability is a central topic of most quality assurance systems.
Why should you calibrate?
In modern production processes, the need for precision monitoring of the ambient conditions during the production process, and to regulate these within a specific range where necessary, is becoming increasingly common. Sectors typically having this requirement include semi-conductor production or manufacturing in the food and pharmaceutical industry. With industrial production processes as well (e.g. drying processes), it is often necessary to monitor the ambient conditions during the process with precision. "Ambient conditions" generally used to refer to monitoring and regulating the ambient temperature, but increasingly also relates to the ambient or process humidity (e.g. relative humidity). Where values such as the temperature or relative air humidity ffect production processes (otherwise, monitoring would simply be a luxury), the need for periodic, documented calibration of the relevant measuring equipment as part of a measuring equipment monitoring system is immediately apparent. To calibrate temperature measurement accuracy, there is an established procedure and a variety of devices on the market (temperature calibrators) that can be used for calibrating temperature measuring equipment.
The situation for calibrating measurement values for "relative humidity" or gas humidity in general is rather different. On the one hand, the potential measurement uncertainties are considerably greater than would intuitively be expected in comparison to temperature measurement uncertainties, and on the other hand, the options for humidity calibration are much more important in terms of usage or they often do not provide the anticipated level of accuracy.
What's Tracebility?
Traceability describes the process in which the value displayed by a measuring device can be compared in one or several steps with a national standard for that specific physical quantity. The steps must form an unbroken chain of calibrations, which means that each measuring device in the chain is compared with a standard (reference) whose metrological characteristics are determined by a comparison with a higher-level
standard. The laboratories and institutes which perform the comparisons within the chain must document their competence through an accreditation according to DIN EN ISO/IEC 17025. Traceable calibrations can be performed by accredited calibration laboratories or DIs respectively NMIs only.
Whitepaper download
What does ISO Calibration mean?
ISO calibrations are comparative measurements of third party devices against in-house high quality reference equipment (factory-level standards). The comparative measurement is performed according to internal procedures which meet the requirements of ISO 9001 or IATF 16949 and provide information about the calibration condition of the specimen. The E+E reference equipment is traceable to national standards, but the ISO calibration process is not accredited. Consequently, ISO calibrations are not traceable and the measurement results are not internationally comparable.
What is Accredited Calibration?
The quintessential characteristic of an accredited calibration certificate is the traceability of measurement results and thus its international comparability. To achieve traceability, the calibration procedures of an accredited laboratory are evaluated and approved by independent assessors. Accredited calibration certificates state the measurement uncertainty which takes into account the calibration process itself. According to ILAC (International Laboratory Accreditation Cooperation) only calibration laboratories or Designated Institutes / NMIs accredited according to DIN EN ISO/IEC 17025 can perform traceable calibrations and guarantee full international comparability of the calibration results. A device which was merely compared with another, trace-able measuring device is not itself traceable since the measurement process was not performed in accordance with an accredited procedure.
What Does Measurement Uncertainty Mean?
Every measured value is associated with an uncertainty. The measurement uncertainty describes to what extent a measurement can be traced to national standards and ultimately to International System of Units (SI) and is a feature of an accredited calibration procedure. The commonly specified extended measurement uncertainty is calculated from the standard uncertainty multiplied with an enhancement factor k=2. Thetest equipment on a higher level in the calibration hierarchy has a lower measurement uncertainty that equipment on a lower level. Accreditation according to DIN EN ISO / IEC 17025 requires the measurement uncertainty to be calculated according to EA-4/02 Guide to Expression of the Uncertainty of Measurement in Calibration (GUM).
What is Meant by Factory Calibration?
A factory calibration certificate represents the manufacturer’s confirmation that the product was manufactured and inspected in compliance with the applicable regulations using the appropriate materials and internal monitoring procedures. The factory calibration certificate is issued according to standards such as DIN EN 10204, documents the final inspection during manufacturing and is no legal poof for traceability. These certificates are offered at lower cost than the accredited calibration certificates and are frequently included in the standard scope of supply of measuring devices.
Calibration Procedure
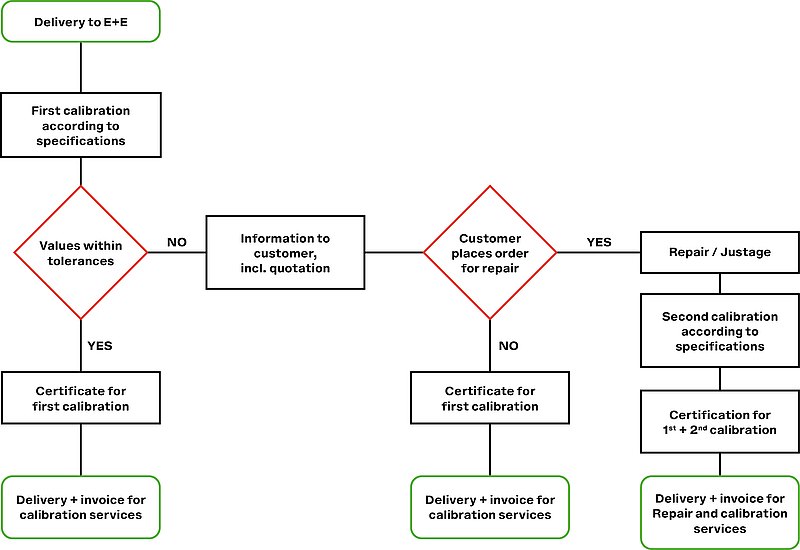
Upon receipt, the device to be calibrated (specimen) undergoes an initial calibration according to customer‘s specification. The calibration results are documented in an “as found” certificate. In the frames of the initial calibration, the results can be compared upon request with the specified tolerances of the specimen. Based on this, the customer can validate the results of previous quality tests or initiate corrective actions.
If the specimen proves defective or out of specs, E+E issues a quotation for repair or adjustment upon customer’s request. In case the specimen cannot be repaired at E+E, it will be returned either to the customer or directly to the manufacturer.
Once the specimen has been repaired and adjusted, it undergoes a second calibration and the results are documented in the “as delivered” calibration certificate.


